18 Jul 2017
Updated 7/10/2018: path updated below and new file on GitHub.
Since this post primarily concerns a Dutch data source, the rest of this post will be in Dutch. English summary below.
De open data die het Centraal Bureau voor de Statistiek (CBS) via Statline (http://statline.cbs.nl) aanlevert is van onschatbare waarde voor analisten. Over diverse thema’s wordt informatie gepubliceerd, zoals woning, demografie, inkomen en arbeid. Erg handig om je verkopen per provincie te vergelijken met de samenstelling van de bevolking bijvoorbeeld. De juiste informatie uit Statline halen was erg lastig, maar dankzij de Power BI Connector voor CBS Open Data / Statline is dat niet meer het geval.
Gebruik
Wanneer je de connector hebt geïnstalleerd (zie beneden) vind je de connector in de lijst met data bronnen in Power BI Desktop:

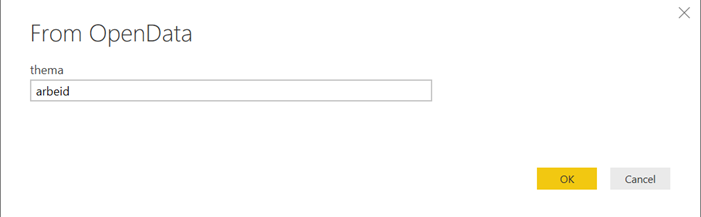
Klik op CBSOpenData en klik Connect. Vul één of meerdere zoekwoorden in (bijvoorbeeld arbeid) en klik OK:
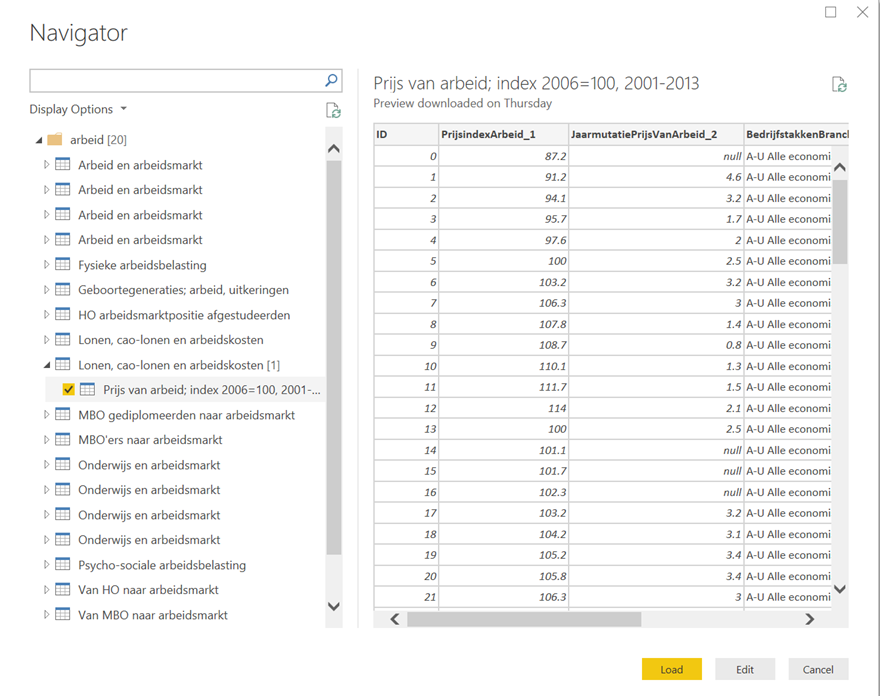
De connector communiceert met de CBS Statline website en levert de thema’s en eventueel bijbehorende tabellen. Dit kan een tijdje duren, afhankelijk van het aantal thema’s en tabellen die horen bij de woorden die je ingevoerd hebt. Kies één of meerdere tabellen en je kunt ze laten of bewerken! Eenvoudiger wordt het niet!
Installatie
Omdat de custom connectors nog erg nieuw zijn is er op dit moment een omweg nodig om ze te kunnen gebruiken in Power BI Desktop. Volg deze stappen:
-
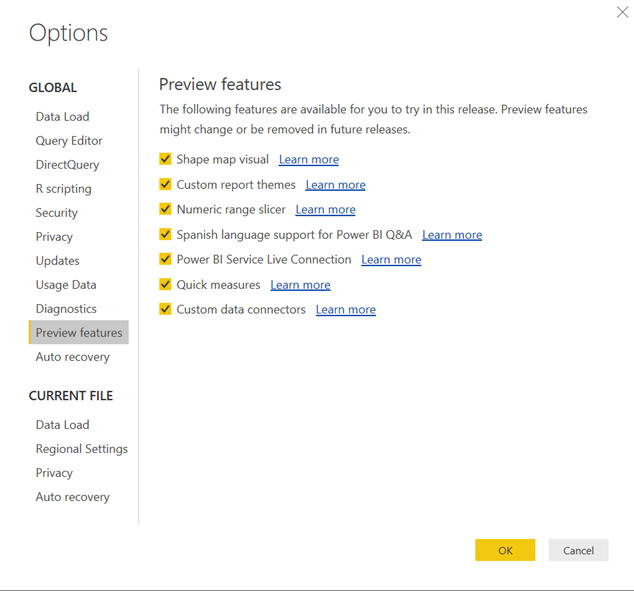
Zet de Custom data connectors preview feature aan binnen Power BI Desktop via File à Options:
- Sluit Power BI Desktop.
- Lees de documentatie op Github om te zien welke directory je moet maken om Power BI de custom connectors te laten laden. Op dit moment is dat [My Documents]\Power BI Desktop\Custom Connectors.
- Download het .mez bestand van de Github van de CBS Open Data connector en sla het bestand op in de directory die je net gemaakt hebt. Je kunt natuurlijk ook de source code helemaal bekijken.
- Start Power BI Desktop op. Als het goed is staat de connector nu onder 'Other' in de lijst (zie screenshot bovenaan in deze post). De snelheid van ophalen is niet hoog, omdat er gebruik wordt gemaakt van de publieke API, maar toch, met wat geduld moet het werken. Veel succes!
English
The CBS Open Data / Statline website (http://statline.cbs.nl) is a very popular source of all types of statistical information about the Netherlands, provided by the government. In order to use this connector in Power BI, download the .mez file from Github and save the file in your custom connectors directory. Please see the documentation to find which directory to use. Enable the Custom Connectors preview feature in Power BI Desktop, restart Power BI and the connector should show up. You can of course also look at the source code on Github. Enjoy!
22 Mar 2017
Azure Data Factory is a fully managed data processing solution offered in Azure. It connects to many sources, both in the cloud as well as on-premises. One of the basic tasks it can do is copying data over from one source to another – for example from a table in Azure Table Storage to an Azure SQL Database table. To get the best performance and avoid unwanted duplicates in the target table, we need to include incremental data load or delta’s. Also, we can build mechanisms to further avoid unwanted duplicates when a data pipeline is restarted.
In this post I will explain how to cover both scenario’s using a pipeline that takes data from Azure Table Storage, copies it over into Azure SQL and finally brings a subset of the columns over to another Azure SQL table. The result looks like this:

The components are as follows:
- MyAzureTable: the source table in Azure Table Storage
- CopyFromAzureTableToSQL: the pipeline copying data over into the first SQL table
- Orders: the first SQL Azure database table
- CopyFromAzureSQLOrdersToAzureSQLOrders2: the pipeline copying data from the first SQL table to the second – leaving behind certain columns
- Orders2: the second and last SQL Azure database table
Setting up the basics is relatively easy. The devil is in the details, however.
-
The linked services
Every data pipeline in Azure Data Factory begins with setting up linked services. In this case, we need two; one to the Azure Table storage and one to SQL Azure. The definition of the linked service to Azure Table Storage is as follows:
{
    "name": "MyAzureStorage",
    "properties": {
        "description": "",
        "hubName": "my_hub",
        "type": "AzureStorage",
        "typeProperties": {
            "connectionString": "DefaultEndpointsProtocol=https;AccountName=[yourstorageaccountname];AccountKey=[youraccountkey]"
        }
    }
}
The SQL Azure linked service definition looks like this:
{
    "name": "MyAzureSQL",
    "properties": {
        "description": "",
        "hubName": "my_hub",
        "type": "AzureSqlDatabase",
        "typeProperties": {
            "connectionString": "Data Source=tcp:[yourdatabase].database.windows.net,1433;Initial Catalog=[yourdatabase];Integrated Security=False;User ID=[youruser]@[yourdatabase];Password=[yourpassword];Connect Timeout=30;Encrypt=True"
        }
    }
}
Note the name property – we will need to refer to it later.
-
The datasets
Datasets define tables or queries that return data that we will process in the pipeline. The first dataset we need to define is the source dataset (called MyAzureTable). The definition is as follows:
{
    "$schema": "http://datafactories.schema.management.azure.com/schemas/2015-09-01/Microsoft.DataFactory.Table.json",
    "name": "MyAzureTable",
    "properties": {
        "type": "AzureTable",
        "typeProperties": {
            "tableName": "[yourtablename]"
        },
        "linkedServiceName": "MyAzureStorage",
        "availability": {
            "frequency": "Hour",
            "interval": 1
        },
		"external":true,
        "policy": { }
    }
}
Note that, again, this item has a name. We will use it in the pipeline later. Also, you will need to specify the name of your Azure Table in the “tablename” property. Note that the “LinkedServiceName” property is set to the name of the linked service we definied earlier. This way, Azure Data Factory knows where to find the table. Also, the “availability” property specifies the slices Azure Data Factory uses to process the data. This defines how long ADF waits before processing the data as it waits for the specified time to pass before processing. The settings above specify hourly slices, which means that data will be processed every hour. We will later set up the pipeline in such a way that ADF will just process the data that was added or changed in that hour, not all data available (as is the default behavior). Minimum slice size currently is 15 minutes. Also note that the dataset is specified as being external (“external”:true). This means that ADF will not try to coördinate tasks for this table as assumes the data will be written from somewhere outside ADF (your application for example) and will be ready for pickup when the slice size is passed.
The target dataset in SQL Azure follows the same definition:
{
    "$schema": "http://datafactories.schema.management.azure.com/schemas/2015-09-01/Microsoft.DataFactory.Table.json",
    "name": "Orders",
    "properties": {
        "type": "AzureSqlTable",
        "linkedServiceName": "MyAzureSQL",
        "structure": [
		{
			"name":"Timstamp",
			"type":"DateTimeOffset"
		},
		{
			"name":"OrderNr",
			"type":"String"
		},
		{
			"name":"SalesAmount",
			"type":"Decimal"
		},
		{
			"name":"ColumnForADFuseOnly",
			"type":"Byte[]"
		},
		{
			"name":"OrderTimestamp",
			"type":"DateTimeOffset"
		}
		],
        "typeProperties": {
            "tableName": "[dbo].[Orders]"
        },
        "availability": {
            "frequency": "Hour",
            "interval": 1
        }
    }
}
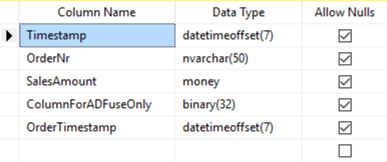
Important to note is that we defined the structure explicitly – it is not required for the working of the first pipeline, but it is for the second, which will use this same table as source. Also note that presence of the column ‘ColumnForADuseOnly’ in the table. This column is later used by ADF to make sure data that is already processed is not again appended to the target table. Of course, the SQL table itself will need to have (at least) the same columns and matching data types:
-
The first pipeline (from Azure Table to SQL)
The first pipeline takes the order data in the Azure table and copies it into the Orders table in SQL Azure. It does that incrementally and with repeatability – which means that a) each slice will only process a specific subset of the data and b) if a slice is restarted the same data will not be copied over twice. This results in a fast processing engine without duplication in the target table – data is copied over once, regardless of the number of restarts. Note that by default ADF copies all data over to the target so you would get so many rows in the table as there are orders in the Azure Table times the number of slices that ran (each slice bringing over the full Azure table). The definition is as follows:
{
    "$schema": "http://datafactories.schema.management.azure.com/schemas/2015-09-01/Microsoft.DataFactory.Pipeline.json",
    "name": "CopyFromAzureTabletoSQL",
    "properties": {
        "description": "Copies data incrementally from Azure Table Orders to Azure SQL Orders table",
        "activities": [
            {
                "name": "CopyActivityTemplate",
                "type": "Copy",
                "inputs": [
                    {
                        "name": "MyAzureTable"
                    }
                ],
                "outputs": [
                    {
                        "name": "Orders"
                    }
                ],
                "typeProperties": {
                    "source": {
                        "type": "AzureTableSource",
						"azureTableSourceQuery": "$$Text.Format('OrderTimestamp ge datetime\\'{0:yyyy-MM-ddTHH:mm:ssZ}\\' and OrderTimestamp lt datetime\\'{1:yyyy-MM-ddTHH:mm:ssZ}\\'', SliceStart,SliceEnd)"
                    },
                    "sink": {
                        "type": "SqlSink",
						"sliceIdentifierColumnName": "ColumnForADFuseOnly"
                    }
                },
                "policy": {
                    "concurrency": 10,
                    "executionPriorityOrder": "OldestFirst",
                    "retry": 3,
                    "timeout": "01:00:00"
                },
                "scheduler": {
                    "frequency": "Hour",
                    "interval": 1
                }
            }
        ],
        "start": "2017-03-20T09:00:00Z",
        "end": "2017-03-22T09:00:00Z"
    }
}
Note that the pipeline consists of a single activity, which is a Copy activity. I could have specified another activity in the same pipeline – I have not done so for simplicity. The Copy activity takes as input the Azure Table (MyAzureTable) and outputs into the SQL Azure Table “Orders”. The source Query is very important – as this is used to select just the data we want! We use the column ‘OrderTimestamp’ which and select only the orders from MyAzureTable where the OrderTimestamp is greater than or equal to the starting time of the slice and less than the end time of the slice. A sample query against the Azure Table executed in this way looks like this:
OrderTimestamp ge datetime’2017-03-20T13:00:00Z’ and OrderTimestamp lt datetime’2017-03-20T15:00:00Z’
Also, look at the specification of the “sliceIdentifierColumnName” property on the target (sink) – this column is in the target SQL Azure table and is used by ADF to keep track of what data is already copied over so if the slice is restarted the same data is not copied over twice.
This pipeline will run each hour (“scheduler” properties), starting at 09:00:00 local clock (“specified by the “start” property) and can run 10 slices in parallel (specified by the “concurrency” property).
-
The second pipeline (from SQL to SQL)
The second pipeline is there to prove the mapping of specific columns to others as well as showing how to do an incremental load from SQL Azure to another target. Note that I use the same linked service so this exercise is not really useful – the same effect could be retrieved by creating a view. The definition is as follows:
{
    "name": "CopyFromAzureSQLOrdersToAzureSQLOrders2",
    "properties": {
        "activities": [
            {
                "type": "Copy",
                "typeProperties": {
                    "source": {
                        "type": "SqlSource",
                        "sqlReaderQuery": "$$Text.Format('select * from [dbo].[Orders] where [OrderTimestamp] >= \\'{0:yyyy-MM-dd HH:mm}\\' AND [OrderTimestamp] < \\'{1:yyyy-MM-dd HH:mm}\\'', WindowStart, WindowEnd)"
                    },
                    "sink": {
                        "type": "SqlSink",
                        "sliceIdentifierColumnName": "ColumnForADFuseOnly2",
                        "writeBatchSize": 0,
                        "writeBatchTimeout": "00:00:00"
                    },
                    "translator": {
                        "type": "TabularTranslator",
                        "columnMappings": "SalesAmount:SalesAmount,OrderTimestamp:OrderTimestamp"
                    },
                    "parallelCopies": 10
                },
                "inputs": [
                    {
                        "name": "Orders"
                    }
                ],
                "outputs": [
                    {
                        "name": "Orders2"
                    }
                ],
                "policy": {
                    "timeout": "1.00:00:00",
                    "concurrency": 1,
                    "executionPriorityOrder": "NewestFirst",
                    "style": "StartOfInterval",
                    "retry": 3,
                    "longRetry": 0,
                    "longRetryInterval": "00:00:00"
                },
                "scheduler": {
                    "frequency": "Hour",
                    "interval": 1
                },
                "name": "Activity-0-[dbo]_[Orders]->[dbo]_[Orders2]"
            }
        ],
        "start": "2017-03-21T10:45:38.999Z",
        "end": "2099-12-30T23:00:00Z",
        "isPaused": false,
        "hubName": "my_hub",
        "pipelineMode": "Scheduled"
    }
}
Note that we specify a “sqlReaderQuery” this time which selects the right subset of data for the slice. We use WindowStart and WindowEnd this time instead of SliceStart and SliceEnd earlier. At this point is does not matter as ADF requires both to be the same. WindowStart and WindowEnd refer to the pipeline start and end times, while SliceStart and SliceEnd refer to the slice start and end times. Using the “translator” properties we specify which columns to map – note that we copy over SalesAmount and OrderTimestamp exclusively.
There you have it – a fully incremental, repeatable data pipeline in Azure Data Factory, thanks to setting up a smart source query and using the “sliceIdentifierColumnName” property. The full source code is available on Github. More info on how this works is available in the official documentation.
Questions? Remarks? Let me know!
 Dutch Data Dude