24 Sep 2013
Excel sheets are notorious for their many formulas, references, cutting, pasting, macro’s, hidden columns and sheets and overall complexity.
My story about Paul is an (very painful) example of what people can build using Excel and how organizations can become dependent on that without even knowing it, ending up in a so-called Excel Hell.
Those “magic Excel sheets” or end-user generated applications contain a lot of information and a lot of business knowledge. They are a bit like spaghetti-code: it is hard to understand how exactly how they are structured and what they do. Something goes in and a result comes out, but what happens in between is in many cases a black box. The reason for this is that they are the product of a long time of development by a non-developer; in the case of Paul this sheet was a product of a career and was built by someone with absolutely no idea about coding standards or even an understanding of what benefit methods in your code could bring.
The problem is however (as per the saying “people trust people, people do not trust data”) that in many cases these exact same magic sheets are used to base decisions on. And I mean not only operational, small-scale decisions but strategic, sometimes life-threatening decisions (heck, even the Nasa is believed to use magic Excel sheets to do some last minute calculations while in mid-flight).
With Excel 2013 Microsoft has taken big steps in turning Excel into a trustworthy BI tool. Not only do we provide great and powerful visualization and analysis capabilities, but also we provide a way of getting data and transforming it that is both powerful and easy to use as well as completely traceable and auditable.
However, it would be silly to believe that from one day to the next everyone would re-build their Excel sheets. They are just to complex to do that or to important or there is simply no time or knowledge available.
In those cases the best we can do is try to understand what happened in those Excel sheets and make it visible in case anything breaks or comes out the wrong way. That’s why Inquire was introduced in Excel 2013. It is an add-in in Excel 2013 which is disabled by default. Once it is activated, an “Inquire” tab is added to the ribbon.

Here we can start our research into understanding the Excel sheet.
Workbook Analysis
When the window opens we get a big list of information about your Excel file and what is in it.
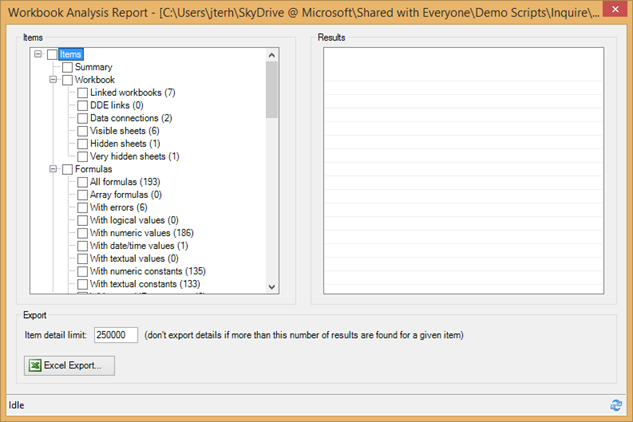
Clicking any header on the left side gives you the exact items and locations in the worksheet. Rather ironically, you can export the results to an Excel file J
Some of the items I find most interesting are:
- linked workbooks
- data connections
- hidden sheets
- very hidden sheets (you can very hide a sheet by going to Visual Basic for Applications (ALT+F11) and change the property of the sheet to very hidden)
- Formulas with errors
- Formulas with numeric / textual constants
- Formulas without cell references
- Formulas referencing blank cells
- Formulas referencing hidden cells
- Formulas referencing external workbooks
- Duplicate formulas
- Inconsistent formulas
- Unused input cells
- Blank referenced cells
- Invisible cells
- Hidden rows and columns
- Named items with errors
-
Warnings
Workbook relationship
The workbook relationship function explores dependencies on other workbooks, for example through linked workbooks and data connections.
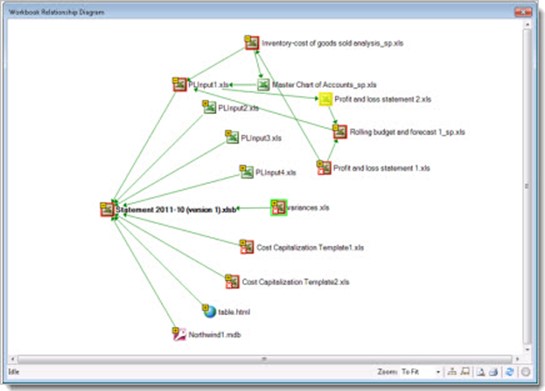
As you can see this sheet has 9 direct dependencies, 7 of which are Excel files, one HTML file and one Access database. The red indicates that the dependency is broken, i.e. the file is no longer accessible. You can right click and fix the relation or dive deeper into the tree of dependencies as I did in the screenshot above.
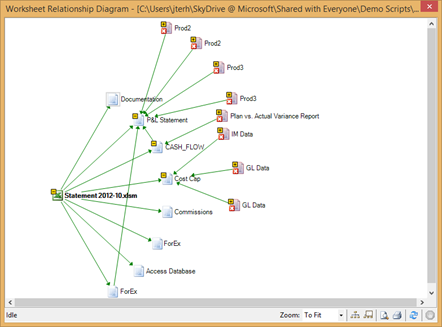
Worksheet relationship
This provides a tree of how worksheets depend on each other. Sometimes you will see relationships between worksheets, which means that formulas on one worksheet reference the other. Additionally, dependencies to other worksheets are shown.
Cell relationship
By far the one of the two most powerful functions is the Cell Relationship Diagram, which you open by click ‘Cell relationship’. It may take a while to generate, as it shows all relations the currently selected cell has with other items. In this example I clicked a cell that contained a formula which resulted in a division by zero error. The cell relationship diagram for this cell is humongous:
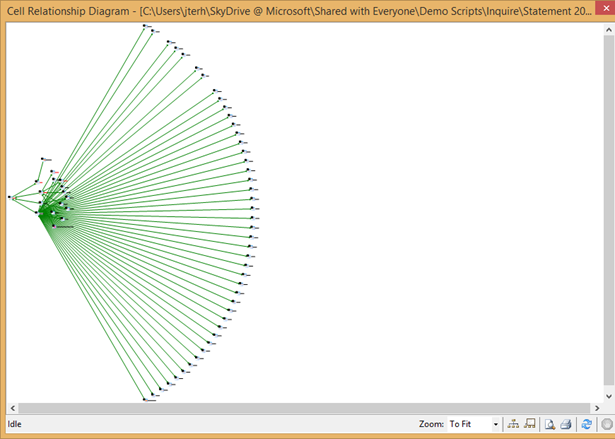
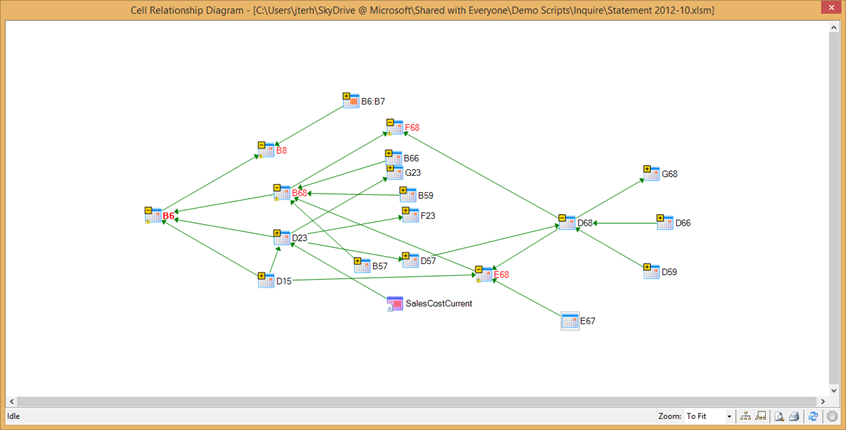
Not looking too good huh? Most of the lines however, point to one problem cell (D15). So I collapsed that for now and then the diagram looks much better:
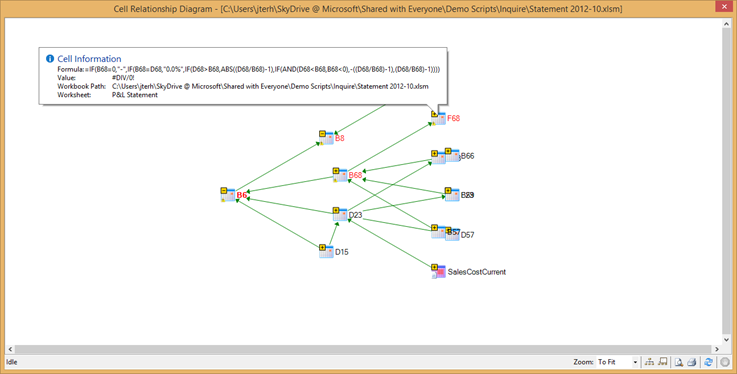
Cells that are marked red have errors. If you hover over a cell in this diagram you get the formula in that cell as shown in the screenshot above. Also note that this tree shows another workbook being referenced. By clicking on the little + signs you can explore further down the tree. In this case I would like to understand why B6 is showing an error. Turns out that B6 references B68, which in turn references E68 (F68 is not referenced by B68 but rather references it, so that explains the error there). It seems like if I could figure out why E68 is erroring, I solve the B68 error and thus the error in B6 and F68. Going a little futher I suspect E67 to be the problem (it is used to divide value D68 in cell E68 but it does not return any value). Double clicking on E67 takes me to the cell in the worksheet. Immediately I see that this is an error: the cell is empty, which causes the chain of division by zero. Now the next step would be to actually change the formula definitions.
Compare Files
Compare files is an interesting function in that it compares not only for structure or content, but also for functions, macro’s and even layout. To use it just open two Excel files and click on ‘Compare Files’. After just a while a new window opens in which you can browse the comparison results (And again export them to Excel J).
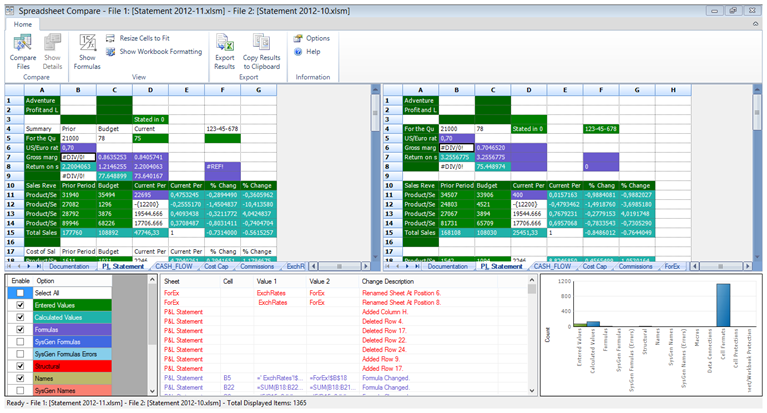
This window is a great tool to understand just how big the differences between the sheets are and how big the potential problem is. On the bottom right we see that some entered values have been changed between these two versions of the same file, some calculated values have changed but the majority of the changes have been in formatting. Now that does not tell me a lot about a problem scenario (formatting normally does not introduce auditability and trust problems now does it?), so I removed it from the diagram by de-selecting it in the list on the left. Now, the diagram shows much more context of the problem:
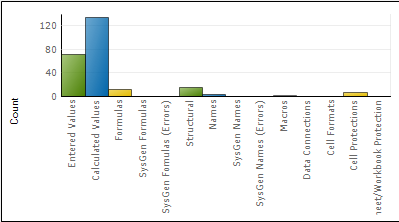
We can now see that some formulas have changed and some structural changes have been made (renaming of sheets, deleting rows and columns). Additionally, one change in a macro has been made (among other things).
Clicking on the structural changes takes me to a list of the structural changes, which tells me exactly where what has been changed:
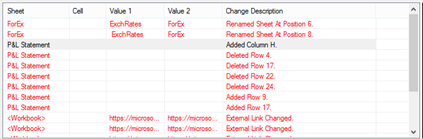
Then for the other problem area: the macro. Selecting the macro change from the list and double clicking on the item brings up another window and here we see the exact line in the macro where the change happened. Apparently somebody changed the 10200 to 10300. This could be a serious mistake!

Clean Excess Cell Formatting
This removes unused cell formatting information. Unused formatting information can dramatically increase the size of your workbook, so removing unused information is always a good idea.
Workbook Passwords
Inquire needs to store workbook passwords if you want to analyze and compare workbooks that are password protected. Using this button you can safely store the workbook passwords so Inquire can open the workbooks on your behalf.
Help
The header says it all: this opens the help file…
In summary: Inquire is a great tool to analyze individual Excel sheets or compare versions of Excel sheets. However, you will need to go through every single Excel sheet one by one. To implement are more automatic check of your Excel (and Access!) files the Audit and Control Management Server is available. ACM Server monitors file shares or SharePoint libraries and automatically tracks versions and changes between versions. I will introduce it and discuss how to set it up and work with it in future blog posts.
More info on Inquire is available at http://office.microsoft.com/en-us/excel-help/what-you-can-do-with-spreadsheet-inquire-HA102835926.aspx?CTT=1/
17 Sep 2013
One of the most exciting tools in Excel has recently released a new version! Get the updated version of Power Map here: http://www.microsoft.com/en-us/download/details.aspx?id=38395 (Excel 2013 only).
This update comes with a ton of new features, including some of the most popular feature requests I have come across.
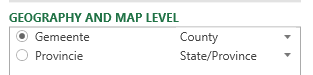
One of the first things that you will see when you add data to Power Map is that Power Map is now more intelligent and automatically suggests how to interpret columns. In the screenshot below it automatically mapped the ‘Gemeente’ (County / Municipalty) and ‘Provincie’ correctly. This goes to show that this automatic mapping not only works with English terms J
The way you choose between types of column charts has changed. You just choose the ‘Column’ type and then on ‘Category’ you can change the chart sub type (clustered or stacked).

Power Map can now also use calculated columns and supports hidden fields. Annotations can now not only contain custom text or fields but can also display an image.
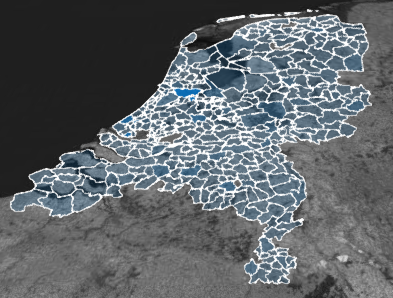
A new visualization type is ‘Region’, which is actually really cool. It provides shapes as available from Bing to overall items on the map. As far as I can see it not only works for the obvious countries, but also for example for provinces in the Netherlands and even the municipalities.
If you have chosen a category for this new type of visualization you can also change the way regions are shaded, for example by relative values in the same category or across all items.
Then, with a tick of a button you can change from a 3D map to a 2D / flat map (note the cool animation).
Also, it is now possible to save your tour to a video right in the tool. Video types can be optimized to presentations and HD displays, computers and tablets and for mobile devices.
One great new feature is that it is now possible to change the coloring of charts, regions and bubbles:

Here is a sample tour I created in 20 minutes based on population data that I loaded from CBS (Central Bureau of Statistics in the Netherlands) using Power Query (hint: make your selection in CBS’ Stat line and use the “from web” option in Power Query to get the data in Excel).
[video width=”1920” height=”1080” mp4=”../wp-content/uploads/2013/09/CBS-Power-Map.mp4”][/video]
10 Sep 2013
In many development projects the need arises to fill a database with some random data. With random data I do not mean mere gibberish, but actual data such as an email address, phone number, SSN, numeric value, dates, datetimes, etc.
With Visual Studio 2010 you can do this very easily. All you need is an edition of Visual Studio 2010 that includes the database projects (I think you will need Ultimate, but am not sure). And of course you will need a database, I used SQL Express in this example.
However, turns out that the data generators included in Visual Studio are somewhat limited. Visual Studio can generate data for many datatypes in SQL Server, but for example generating a phone number, SSN or email address is not possible.
However, one can easily create custom data generators, which is exactly what we will do. I will build custom data generators for email addresses and one that generators Lorem Ipsum text.
Building the custom data generators
Start with creating a new class library project. In the solution explorer, right-click the project and click ‘Add Reference’. Click the ‘.NET’ tab and select the following components: Microsoft.Data.Schema, Microsoft.Data.Schema.SQL and Microsoft.Data.Schema.Tools. Click ‘OK’ to add these references.
Open your class (I renamed my class and class file to LoremIpsumGenerator) and add the following using statements:
using Microsoft.Data.Schema.Tools.DataGenerator;
using Microsoft.Data.Schema.Sql;
using Microsoft.Data.Schema.Extensibility;
Now we need to inherit the Generator class by changing our class definition to:
public class LoremIpsumGenerator: Generator
Also add the DatabaseSchemaProviderCompatibilityAttribute to your class declaration as so:
[DatabaseSchemaProviderCompatibility(typeof(SqlDatabaseSchemaProvider))]
public class LoremIpsumGenerator: Generator
Now we need to add an output property. This will be used to wire up the output of your generator to Visual Studio Data Generation Plans.
private string _output;

[Output(Description = " Default output ", Name = " Default output ")]
public string Output {
 get { return _output; }
}
Also, if you need to specify some parameters to your data generator we need to create some input properties. I have created three: one for the number of words to generate, one to indicate if the data needs to start with ‘Lorem Ipsum…’ every time and one to specify if just random words can be selected or if we are more interested in sentences. Also note the default settings at the bottom.
[Input(Description="The number of words to generate",Name="Number of words")]
public int NumberOfWords
 {
  set { _numberOfWords = value;}
  get { return _numberOfWords;}
 }

[Input(Description = "Start with Lorem Ipsum?", Name = "Start with Lorem Ipsum")]
public bool StartWithLoremIpsum
 {
  set { _startwithLoremIpsum = value; }
  get { return _startwithLoremIpsum; }
 }

[Input(Description = "Choose random words (true) or follow sentences (false)", Name = "Choose random words")]
public bool ChooseRandomWords
 {
  set { _chooseRandomWords = value; }
  get { return _chooseRandomWords; }
 }

private int _numberOfWords = 50;
private bool _startwithLoremIpsum = true;
private bool _chooseRandomWords = false;
Then all we need to do is override the OnGenerateNextValues() method. Since I wanted to Unit test my generator I have just one line in this method, which class a public void method (which my testing command line project can call). In this function (called Generate) I built the output based on Lorem Ipsum and set my Output property.
protected override void OnGenerateNextValues()
 {
 Generate();
 }

public void Generate()
 {
StringBuilder sb = new StringBuilder();
if (_chooseRandomWords)
 {
  for (int i = 0; i < NumberOfWords; i++)
  {
   sb.Append(_myList.getRandom() + " ");
  }
  _output = sb.ToString();
 }
else
{
 _output = _myList.GetText(NumberOfWords, StartWithLoremIpsum);
}
_output = char.ToUpper(_output[0]) + _output.Substring(1);
}
I will not discuss how exactly I managed to get the Lorem Ipsum words returned. If you want to know you can download the source code. Also, my email address generator follows the same structure of output, inputs (in this case none) and a generate function that creates the email address string and sets the output property.
Registering the data generators
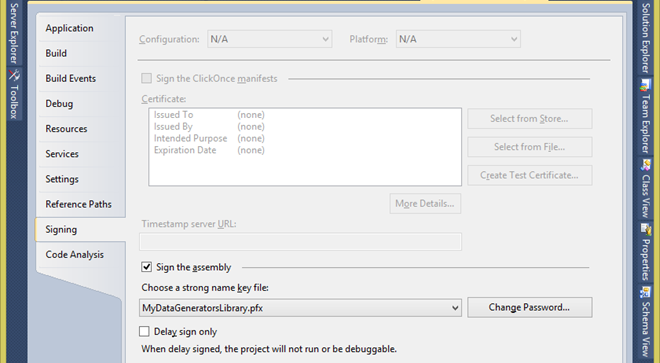
If your data generators build successfully, we need to sing the generators with a strong name. To do this, right-click your project’s name and choose properties. Go to the Signing tab and select the ‘Sign the assembly’ check box and under ‘Choose a strong name key file’ choose ‘New…’. Follow the wizard and enter a password. Your screen now looks like this:
Now save all, and rebuild your solution.
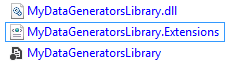
Next we will need to create an XML file to accompany your DLL. Just add a XML file to your project and name it [YourProjectsName].Extensions.xml. My project (and thus my dll) is named MyDataGeneratorsLibrary, so the filename of the XML is: MyDataGeneratorsLibrary.Extensions.xml
Open the XML and replace the contents with this (you will have to fill in your own values).
xmlns="urn:Microsoft.Data.Schema.Extensions"
xmlns:xsi="http://www.w3.org/2001/XMLSchema-instance"
xsi:schemaLocation="urn:Microsoft.Data.Schema.Extensions Microsoft.Data.Schema.Extensions.xsd">
As you can see, we need an Extension element for each generator. In my library I have created two generators (one for Lorem Ipsum text, and one for email addresses). Also you will have to specify the correct type (which is your classname and namespace) and the assembly (which again is your DLL file / project name). Last item to enter is the public key token. To get it open your Visual Studio Command prompt and use
sn.exe -T assembly_name.dll
to get the public key token returned to you. You will need to enter the correct path and file name. Copy paste the public key token into the XML.
One last thing I did is right click the XML and chose Properties. I changed the ‘Build Action’ to ‘Content’ and the ‘Copy to Output Directory’ property to ‘Copy always’. It does not matter in any way but it makes the next step just a bit easier.
Now, build your solution and navigate to your solutions directory. In there go to the bin\Debug folder, and copy your DLL and XML file.
Now it is time to register the data generators with Visual Studio. Be sure your Visual Studio 2010 instance is closed and navigate to the following folder: C:\Program Files (x86)\Microsoft Visual Studio 10.0\VSTSDB\Extensions . It is good practice to keep your own extensions in a separate folder, so I created a folder ‘CustomGenerators’ and I advise you do the same. Next, paste your DLL and XML files into this folder.
Start Visual Studio.
Using the data generators to generate data
In Visual Studio, add a new project to your solution or create a new solution. Select SQL Server Database Project as the project type and enter a fancy name. I assume you already have built your database schema. Right click on your project name and choose ‘Import Objects and Settings’ and follow the wizard to get your database schema into your project. Next, add a new Data Generation Plan and open it. Select the table you want to use and specify the number of rows to insert.
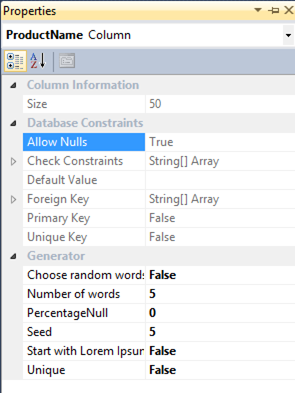
You will see a list of the columns in the table. To the right (under ‘Generator’) you can specify which generator you want to use to generate data with. It should contain your custom generators now. Select it and click the preview button to test your generator:  . Here is my screenshot:

If you have any input properties specified you can change the values by selecting the row and opening the properties window, see below screenshot for my Lorem Ipsum generator.
That concludes my introduction into custom data generators. Download the source code (with the Lorem Ipsum and email address generators) on Github.
03 Sep 2013
One of the most-heard questions related to SSRS is if it possible to somehow create SSRS report templates so reports get the same look and feel.
SSRS does not work with some kind of stylesheet or CSS sheet to change the layout of new and existing reports. However, with a bit of creativity we can create a template for new reports. Note that this does not solve the implicit requirement of the question: deployed reports will still require rework if the template changes.
To create your own template, simply create a report and save it in a folder in your Visual Studio installation. The folder you will be looking for is C:\Program Files (x86)\Microsoft Visual Studio 11.0\Common7\IDE\PrivateAssemblies\ProjectItems\ReportProject for Visual Studio 2012 and C:\Program Files (x86)\Microsoft Visual Studio 10.0\Common7\IDE\PrivateAssemblies\ProjectItems\ReportProject for Visual Studio 2010.
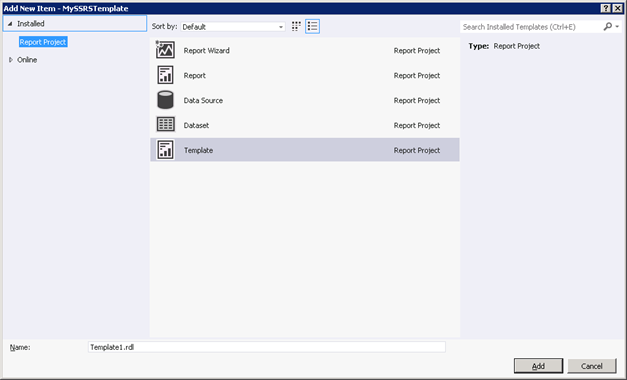
I created a simple template with a header with a logo and a footer and saved the report in the folder. Now when I add a new item I can choose my template to base my report on:
Again, this is a one-of template in the sense that it is not as flexible as a stylesheet. If you need to change the template after reports have been deployed you will need to re-do the reports.
27 Aug 2013
This is the third post in my series about multilingual SSRS reports. If you missed the introduction, you can find it here.
I am looking for feedback! Please let me know what you think!
The full code of the solution I describe here is available on Github.
What we will be doing in this post is developing something which called a Report Definition Customization Extension (RDCE), which is available since SQL Server 2008. The MSDN page is here: http://msdn.microsoft.com/en-us/library/dn296363.aspx
Let’s first start with the basics: what is a RDCE and what can it be used for?
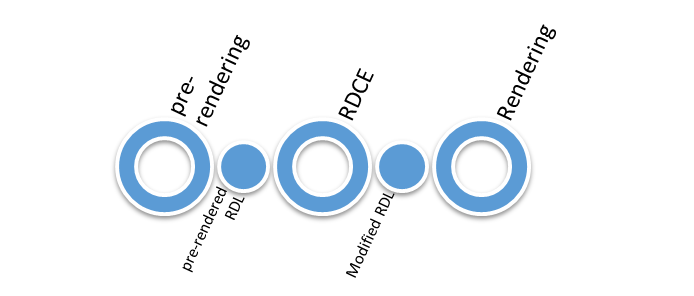
Simply put a RDCE transforms an existing report definition (RDL) and modifies it just before the SSRS rendering engine renders the report. In other words building an RDCE allows you to interfere with the report rendering process and make some last minute changes just before rendering starts. In a schema it looks like this:
As this post is about making reports multilingual you might already have guessed that one of the uses of an RDCE is doing translations. However, you can also change the report’s look by hiding elements and even change the data set returned. This is useful if you not only need to translate labels in your report but also want to actually return text strings from your dataset in a different language. Another option would be for example to deal with right-to-left languages by changing your report’s layout.
Developing a RDCE
An RDCE is a .NET class library, where you will have to select .NET framework 3.5 as the target framework. This class library will need a reference to Microsoft.ReportingServices.Interfaces.dll. This contains the interface you will need to implement (see below). So let’s get started.
First off, start Visual Studio and create a new class library project (targeting .NET framework 3.5).
Include a reference to the aforementioned Microsoft.ReportingServices.Interfaces.dll file by right clicking ‘References’ in your Solution Explorer and choosing ‘Add Reference…’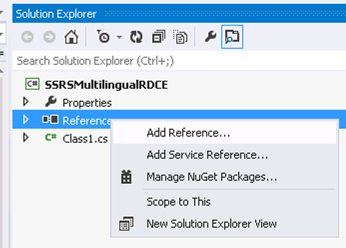
The file is located under your SSRS installation directory. In my case the file was in C:\Program Files\Microsoft SQL Server\MSRS11.MSSQLSERVER\Reporting Services\ReportServer\bin.
Now open your class file (I renamed it to MyRDCE.cs) and add the following line:
using Microsoft.ReportingServices.Interfaces;
Then, implement IReportDefinitionCustomizationExtension by changing your class declaration to:
public class MyRDCE: IReportDefinitionCustomizationExtension
You can explicitly implement this interface to get an idea of the methods you will need to implement by right-clicking the interface name and choosing ‘Implement Interface Explicitly’.
Your code should now look like this:
using System;
using System.Collections.Generic;
using System.Linq;
using System.Text;
using Microsoft.ReportingServices.Interfaces;

namespace SSRSMultilingualRDCE
{
    public class MyRDCE: IReportDefinitionCustomizationExtension
    {
        bool IReportDefinitionCustomizationExtension.ProcessReportDefinition(byte[] reportDefinition, IReportContext reportContext, IUserContext userContext, out byte[] reportDefinitionProcessed, out IEnumerable<RdceCustomizableElementId> customizedElementIds)
        {
            throw new NotImplementedException();
        }

        string IExtension.LocalizedName
        {
            get { throw new NotImplementedException(); }
        }

        void IExtension.SetConfiguration(string configuration)
        {
            throw new NotImplementedException();
        }
    }
}
Let’s start with the easiest method: IExtension.LocalizedName, which just returns the name for your RDCE. I replaced the line in this method with:
get { return "SSRSMultilingualRDCE"; }
Yes, I know I should not have hardcoded the name here, but for demonstration purposes this will do.
As developing an RDCE is as hard as it is (never mind the debugging, testing, logging and deployment challenges you will have to deal with) I suggest adopting the framework Holger Schmeling introduced in his blog on RDCE’s. This framework allows you to componentize your transformations into smaller transformations instead of one lengthy bit of code. By doing so the RDCE can be more easily managed and understood. Notice that in this blog I will not deal with logging and error handling; however, in production that should be included. To use this framework we add an interface called ITransformation with one method named Transform. Just add a new Interface file to your solution, name it ITransform and copy paste the following code in (adapted from Holger’s blog):
using System;
using System.Collections.Generic;
using System.Linq;
using System.Text;
using System.Xml.Linq;
using Microsoft.ReportingServices.Interfaces;

namespace SSRSMultilingualRDCE
{

///<summary>
/// Interface to implement for one RDCE transformation step.
///</summary>

public interface ITransformation
{
///<summary>
/// Receives an XML element and returns transformed element to the sender
///</summary>
///<param name="report">Report to convert.</param>
///<param name="reportContext">Report context as conveyed to the RDCE</param>
///<param name="userContext">User context as conveyed to the RDCE</param>
///<returns>Transformed report</returns>

 XElement Transform(XElement report, IReportContext reportContext, IUserContext userContext);
 }
}
The Transform() method takes a report definition in XML format and returns the modified version. The other two parameters provide the report and user context as returned from SSRS. This is handy to dynamically apply transforms based on these contexts.
Now it is time to add a list to hold all the transformations (Again thanks to Holger’s blog). Add the following code directly under the class statement in your RDCE class:
//List holding all transformations
private IList<ITransformation> _transformations;
Also implement the ProcessReportDefinition() method that will be called by reporting services. This is the mother-transformation process. What we will do here is load the report and one-by-one call the registered transformations on the report. Find your ProcessReportDefinition() method and replace it with the following (you will need extra using statements).
bool IReportDefinitionCustomizationExtension.ProcessReportDefinition(byte[] reportDefinition, IReportContext reportContext, IUserContext userContext, out byte[] reportDefinitionProcessed, out IEnumerable<RdceCustomizableElementId> customizedElementIds) {

 //load report from byte[]
 XmlDocument d = new XmlDocument();
 MemoryStream ms = null;
 using (ms = new MemoryStream(reportDefinition)) {
  d.Load(ms);
  ms.Position = 0;
 }
 XElement report = XElement.Load(new XmlNodeReader(d));

 //run all transformations
 if (_transformations != null)
 {
  foreach (ITransformation t in _transformations)
  {
   report = t.Transform(report, reportContext, userContext);
  }
 }

 //convert report to byte[] so it can be returned to SSRS
 System.Text.Encoding enc = new System.Text.UTF8Encoding();
 reportDefinitionProcessed = enc.GetBytes(report.ToString());

 //we have to inform SSRS about what we changed. In this sample we only change the body part of the report.
 //Other values are: DataSets, Page, PageHeader, PageFooter
 List<RdceCustomizableElementId> ids = new List<RdceCustomizableElementId>();
 customizedElementIds = new List<RdceCustomizableElementId>();
 (customizedElementIds as List<RdceCustomizableElementId>).Add(RdceCustomizableElementId.Body);

 return true;
}
This method first retrieves the report definition. Then all transformations are applied, after which the resulting report definition is returned and SSRS is informed about what we changed.
Following Holger’s framework we use the SSRS config file to define transformations. This might not be the ideal solution for your scenario since it involves editing the SSRS config file. However, on the plus side this allows you to register new transformations as required without having to redeploy or change the RDCE. Basically we need to change the rsreportserver.config (mine was in C:\Program Files\Microsoft SQL Server\MSRS11.MSSQLSERVER\Reporting Services\ReportServer) file and add something along these lines (do not forget to make a backup first!) as last entry in the <Extensions> node:
<!-- RDCE -->
<ReportDefinitionCustomization>
 <Extension Name="SSRSMultilingualRDCE" Type="SSRSMultilingualRDCE.MyRDCE,SSRSMultilingualRDCE">
  <Configuration>
  <!-- Transformations go here-->
   <Transformations>
    <Transformation Name="MyTranslator" Type="SSRSMultilingualRDCE.Transformations.MyTranslator,SSRSMultilingualRDCE">
     <Property Name="SampleProperty" Value="c:\temp\myDictionary.txt"/>
    </Transformation>
   </Transformations>
  </Configuration>
 </Extension>
</ReportDefinitionCustomization>
You can specify multiple Transformations by repeating the Transformation node as necessary. Note that Name and Type specify the name of the class and the namespace. Also, each Transformation can have custom properties set (name, value pairs).
Now, we can use the SSRS SetConfiguration() methods to get to the configuration settings in the rsreportserver.config file. This enables us to read the list of transformations registered and fill the list created earlier. We will do this by implementing our final function of the IReportDefinitionCustomizationExtension: SetConfiguration() (you will need another using statement at the top of your class).
void IExtension.SetConfiguration(string configuration) {
 if (string.IsNullOrEmpty(configuration)) {
  return;
 }
 _transformations = new List<ITransformation>();
 //load the configuration
 XElement config = XElement.Parse(configuration);
 //retrieve the transformations
 if (config.Name.LocalName == "Transformations")
 {
  //get the transformations
  var trans = from transformation in config.Descendants("Transformation")select new {
  Name = transformation.Attribute("Name").Value,
  Transformator = transformation.Attribute("Type").Value.Split(',')[0],
  CodeBase = transformation.Attribute("Type").Value.Split(',')[1],
  Properties = transformation.Descendants("Property")
  };
  //lets add a transformation step for each transformation found
  foreach (var t in trans)
  {
   ITransformation transformation = (Activator.CreateInstance(t.CodeBase, t.transformator).Unwrap() as ITransformation);
   //if we specified additional properties, set them now
   if(t.Properties!=null) {
    foreach(var p in t.Properties) {
     string propName = p.Attribute("Name").Value;
     string propValue = p.Attribute("Value").Value;
     PropertyInfo propertyInfo = transformation.GetType().GetProperty(propName);
     if(propertyInfo!=null) {
      propertyInfo.SetValue(transformation, propValue,null);
     }
    }
    //add the transformer to the list
    _transformations.Add(transformation);
   }
  }
 }
}
Now that we have a functioning RDCE framework it is time to put it to work. In this sample I will build a simple translator transformation which will translate some texts in a report by looking them up in a database table. I added a new class to my solution, named it MyTranslator and put it in the SSRSMultilingualRDCE.Transformations namespace as configured in the reportserver.config file above. The code pretty much speaks for itself. It implements the Transform method from the ITransformation interface, retrieves the user language preference setting and retrieves the translation from the database:
using System;
using System.Collections.Generic;
using System.Linq;
using System.Text;
using Microsoft.ReportingServices.Interfaces;
using System.Xml.Linq;
using System.Data;
using System.Data.SqlClient;

namespace SSRSMultilingualRDCE.Transformations
{
    class MyTranslator : ITransformation
    {
        private SqlConnection _sqlConn;

        public MyTranslator()
        {
            _sqlConn = new SqlConnection("server=.;Database=SSRSMultiLingual;Trusted_Connection=True");
        }

        public XElement Transform(XElement report, IReportContext reportContext, IUserContext userContext)
        {
            if(reportContext == null)
            {
                throw new ArgumentException("ReportContext not initialized");
            }

            if(!(_sqlConn.State == ConnectionState.Open)){
               _sqlConn.Open();
            }

            //get the users userName and look up the preferred language.
            SqlCommand cmd = new SqlCommand("SELECT Language from UserConfiguration where UserName='" + userContext.UserName + "'",_sqlConn);
            SqlDataReader sdr = cmd.ExecuteReader();
            sdr.Read();
            string language = (string) sdr["Language"];
            sdr.Close();

            //translate all textbox items (<TextRun><Value>TEXT</Value></TextRun>)
            //we will skip expressions (starting with =)
            report.Descendants().Where(x => x.Name.LocalName == "Value" && x.Parent.Name.LocalName == "TextRun" && (!x.Value.StartsWith("=")))
                .ToList()
                .ForEach(x => x.Value = Translate(x.Value, language));

            _sqlConn.Close();
            return report;
        }

        private string Translate(string p, string language)
        {
            if (string.IsNullOrEmpty(p))
            {
                return "";
            }

            string translated = p;
            //get translation from database
            SqlCommand cmd = new SqlCommand("SELECT T.Value from Translations T inner join Items I on T.Item=I.Id WHERE I.Name='"+p+"' AND T.Language='"+language+"'",_sqlConn);
            SqlDataReader sdr = cmd.ExecuteReader();
            sdr.Read();
            translated = (string)sdr["Value"];
            sdr.Close();

            //have we got a translation? Of not, fall back to Microsoft Translator
            if (string.IsNullOrEmpty(translated))
            {
                //connect to Microsoft Translator and return translation
            }
            return translated;
        }
    }
}
Deploying a RDCE
Now that we have successfully built a translator we’re done with development and are ready for deployment. To deploy your RDCE to the SSRS server follow these steps:
First, copy you RDCE assembly (.dll file, in my case SSRSMultilingualRDCE.dll) into the Reporting Services bin directory (which in my case was C:\Program Files\Microsoft SQL Server\MSRS11.MSSQLSERVER\Reporting Services\ReportServer\bin). If you have referenced any assemblies not in the Global Assembly Cache (maybe you implemented some logging framework) do not forget to copy them here as well.
Next we need to modify the SSRS configuration, starting with the rsreportserver.config file. It is located in C:\Program Files\Microsoft SQL Server\MSRS11.MSSQLSERVER\Reporting Services\ReportServer. Open it and lookup the <Service> element and add the following to that element (I added it to the bottom):
<IsRdceEnabled>True</IsRdceEnabled>
Next configuration change will be done in the rssrvpolicy.config file in the same directory as before. Open the file and add a CodeGroup in the PolicyLevel element for your RDCE assembly, like so:
<CodeGroup class="UnionCodeGroup" version="1" PermissionSetName="FullTrust" Name="SSRSMultilingualRDCE" Description="SSRSMultilingualRDCE">
 <IMembershipCondition class="UrlMembershipCondition" version="1" Url="C:\Program Files\Microsoft SQL Server\MSRS11.MSSQLSERVER\Reporting Services\ReportServer\bin\SSRSMultilingualRDCE.dll"/>
</CodeGroup>
You will need to specify the correct Name for the CodeGroup (just let it match the nam of your RDCE) and the correct location and name of the DLL you copied.
You may have to set up the permissions in the web.config file as Holger reports in his blog, although I have not had to do that.
To make your reports work with the RDCE there is a little thing we need to do; we need to link our reports with the RDCE deployed. The official way of doing this is using the Reporting Services Management Service. However, to use it you either need to have a deployment tool or be willing to write one. The unsupported way however is directly updating the report properties in the SSRS catalog. Please note that this is unsupported and I give no guarantees whatsoever regarding damage afflicted or the working of this on future versions. If you want to follow along take the following steps:
Open SQL Server Management Studio and execute the following query on your SSRS Service Database (not the TempDB) (you will have to adapt the where clause to match the name of your report):
select ItemID,Path,Name,Description, cast(Property as xml) as Property, cast(Parameter as xml) as Parameter
from dbo.Catalog
where name like '%RDCE%'
This returns among others the ItemID, which you will need for the next statement. What we need to do is add <RDCE>Name_Of_Your_RDCE</RDCE> to the properties of the reports that need to use the RDCE.
Your will need to execute a query that looks like mine:
update dbo.Catalog set Property='<Properties> <Language>en-US</Language>  <HasUserProfileQueryDependencies>False</HasUserProfileQueryDependencies>
 <HasUserProfileReportDependencies>False</HasUserProfileReportDependencies>
 <PageHeight>279.4</PageHeight>
 <PageWidth>215.9</PageWidth>
 <TopMargin>25.4</TopMargin>
 <BottomMargin>25.4</BottomMargin>
 <LeftMargin>25.4</LeftMargin>
 <RightMargin>25.4</RightMargin>
 <RDCE>SSRSMultilingualRDCE</RDCE>
 </Properties>'
where ItemID='BBA6EBDD-F094-4E10-892A-D9DF2834A787'
I have simply copied and pasted the ItemID in the where clause and also copied and pasted the value of property from the previous query into this query. I have appended the <RDCE> element just before the closing of the properties element. My report will now use the RDCE.
Debugging
When rendering a report that uses a RDCE SSRS will display any errors thrown by your code. This helps in debugging. Also note that if you make any changes to the code you will have to recopy your assembly and restart the SSRS service for SSRS to pick up the new version.
Putting it all together
All that remains now is showing that this works. I have created a very simple report for this:
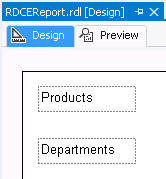
This report contains two textboxes with labels in them. These labels were defined in the database and the database contains a translation for it. As a result my RDCE will translate these labels, depending on the user’s preferred language.
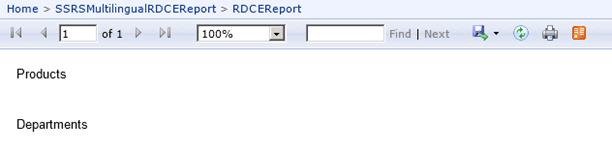
So, when a user with preference for English logs in this will be displayed:
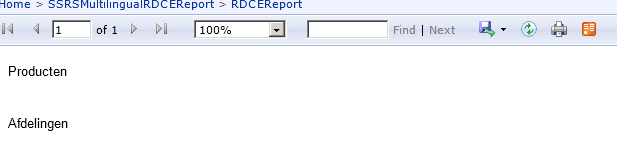
And when a user with preference setting for Dutch opens the report it displays as follows:
My solution works with a configuration database setting for the user’s preference. However, just as easily one could adapt the code to read the setting from the SharePoint profile (if using SSRS in SharePoint integrated mode) or for example from Active Directory.
That concludes my lengthy blog on RDCEs. You can download my solution on Github. It includes a database project that will create the simple database I used and enter some sample data. Also, it includes all code discussed and the sample report I used. The configuration changes are for security reasons not included.
I am looking for feedback! Please let me know what you think!
 Dutch Data Dude